Let’s say you have some websites that you frequent on a regular basis. Let’s also say you have some websites that you frequent but also send custom information in the URL to – say, a specific commit to your git repository. Wouldn’t it be neat if you could get to those websites faster and with less keyboard mashing typing? Enter custom searches for your browser!
Alright, let’s add some custom searches to your browser
First off, this will definitely work for Chrome and Firefox. I’m not certain if it works for others.
Adding custom searches to Chrome
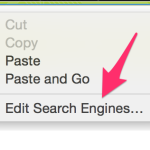
 Right-click on the address bar and select the Edit Search engines… option. This should open a new tab and bring you to “chrome://settings/searchEngines” (Alternatively, you could just enter that to the address bar). On this page you’ll find the default search engines like Google and Yahoo but below that list you’ll see a list of search engines labelled “other”. This is where the magic is.

- Click the input box for Add a new search engine and add a name. For example: My Repo.
- In the input box for Keyword add the keyword you want to use to activate this new search. For example: autourl.
- In the input box for URL with %s in place of query add the URL you want to head to when entering the keyword in step 2. For example: https://github.com/dougdragon/automate_URL_test/.
Now, when you enter autourl in the address bar, you’ll be taken right to https://github.com/dougdragon/automate_URL_test/.
Pretty good magic, right? Want even more magic? Check this out: say you wanted to see a specific commit on the repo above. Follow these steps to add a custom keyword that also takes a parameter.
- In the input box for Add a new search engine and add a name. For example: My repo commit.
- In the input box for Keyword add the keyword you want to use to activate this new search. For example: autocommit.
- In the input box for URL with %s in place of query add the URL you want to head to when entering the keyword but this time you’ll want to add a %s for the query. For example, to see a specific commit from the github.com/dougdragon/automate_URL_test/ repository, I would add the following to the URL input box: https://github.com/dougdragon/automate_URL_test/commits/%s.
Now, when you enter autocommit in the address bar and press the space bar, the address bar will show the name of your search engine and prompt you for the parameter. Paste in the commit hash into the address bar and hit enter and you’ll be looking at that specific commit on your repository!

Adding custom searches to Firefox
Adding custom searches to Firefox is a little more involved. Here are the steps:
- First, you have to save the URL to your favorites.
- After saving the URL to your favorites, you’ll need to go to the bookmark library
- You can get there by clicking the Show All Bookmarks or pressing Ctrl+Shift+B
- Locate your saved bookmark and select it.
- Once it’s selected, you should see a More button on the bottom of the page.
- Clicking the More button shows some extra information about this bookmark, one of them being Keyword. Enter your desired keyword here.
- If you want to be able to add a parameter to the query, throw in the same %s where you want to add the parameter to and it’ll perform just like the Chrome search.

